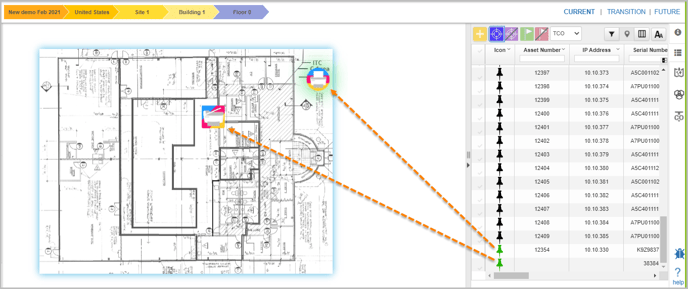
Real assets are visible in Transition State as well. Real devices can be plotted in two different ways:
Method 1: Dragging and Dropping Devices
Drag and drop the particular asset icon from the Master Lookup Table to the floor map area as seen in the figure below. After plotting a device, click the device to view the Asset Property window on the left panel.

📓 - For plotting to occur, the Fleet Designer needs to specifically drag and drop the device icon on the floor map.
Method 2: Plotting a Device Manually
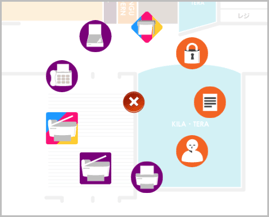
The Fleet Designers can also plot devices manually on the floor map using the Spiral menu. Once a device has been plotted manually, it’s called an Empty device. By default, these devices do not have any properties. In short, these are the devices without any details. Empty devices (both real and virtual) cannot be involved in page volume transfer.
To open the Spiral menu:
- Click anywhere on the floor map.
- From the Spiral menu, select a device to be plotted.

- To close the Spiral menu, click the cross icon in the center of the spiral menu.
| Spiral Menu Icons (Clockwise) | Icon Name |
 |
Plotter |
 |
Lock |
 |
Notes |
 |
Multifunction Color |
 |
User |
 |
Print Mono |
 |
Multifunction Mono |
 |
Fax |
 |
Scanner |
Not all device types are available in the Spiral menu. After assigning the device details, the device type updates automatically.
📓 - The size of the Spiral menu adjusts according to the size of the devices on the floor.
The properties of this manually added device can be added using the Asset Property window. The newly added properties of the device are also displayed in the Master Lookup Table. The device type of the device can be changed using the Device Type field under the Basic tab of the Asset Property window. Click the Save button after making the changes.
To view the plotted assets in the Master Lookup Table, enable only the Plotted and In-Scope filters and disable all the other filters.
📓 - The user can also plot devices manually using the Add Asset icon on the Master Lookup table.