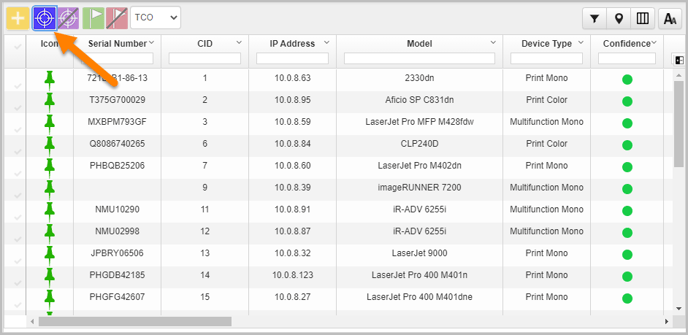
After importing the devices, clicking on the Master Lookup Table opens up with the In-Scope filter. This filter is enabled by default.

📓 - The blue colored rectangular outline borders indicate that the filter is enabled.
The user can make use of Add Asset icon ![]() to add new assets on the floor map.
to add new assets on the floor map.
For better understanding, the following table explains each filter function of the Master lookup Table.
| Icons | Master Lookup Table Filters | Functions |
|
|
In-Scope | Displays all the device data that have been imported to the Master Lookup Table or added manually on the floor map. Anytime the users want to view all the plotted and unplotted devices, they can enable this filter. It includes both the plotted and unplotted device details of the floor. |
|
Out-of-Scope |
Displays those devices that the Fleet Designer does not intend to plot. These devices can be moved out from In-Scope to Out-of-Scope filter. The process of moving the devices from one filter to the other is called Tagging. Note that tagging is not allowed in Transition State. Tagging can be used to move devices from the In-Scope to Out-of-Scope filter and vice versa. In order to mark the devices as out-of-scope:
To move the device back to In-Scope filter:
|
|
|
Plotted | Displays the device data that have been plotted on the floor map. To view only the plotted devices, select only the In-Scope and the Plotted filters. |
|
|
Unplotted | Displays the device data that are not yet plotted. To view only the unplotted device, select the In-Scope button along with the Unplotted button. |
📓 - Plotted or Unplotted buttons cannot be selected individually, without enabling the In-Scope button and disabling the Out-of-Scope button.